Posts tagged blue
around the block quilt

front of around the block quiltThis was one of the those quick projects that took me ages to finish.  The colors are not ones I usually work with so I had a difficult time deciding how the blocks should work together.  I shuffled them around so many times.  I kind of hated it and then I loved it. corner of around the block quilt

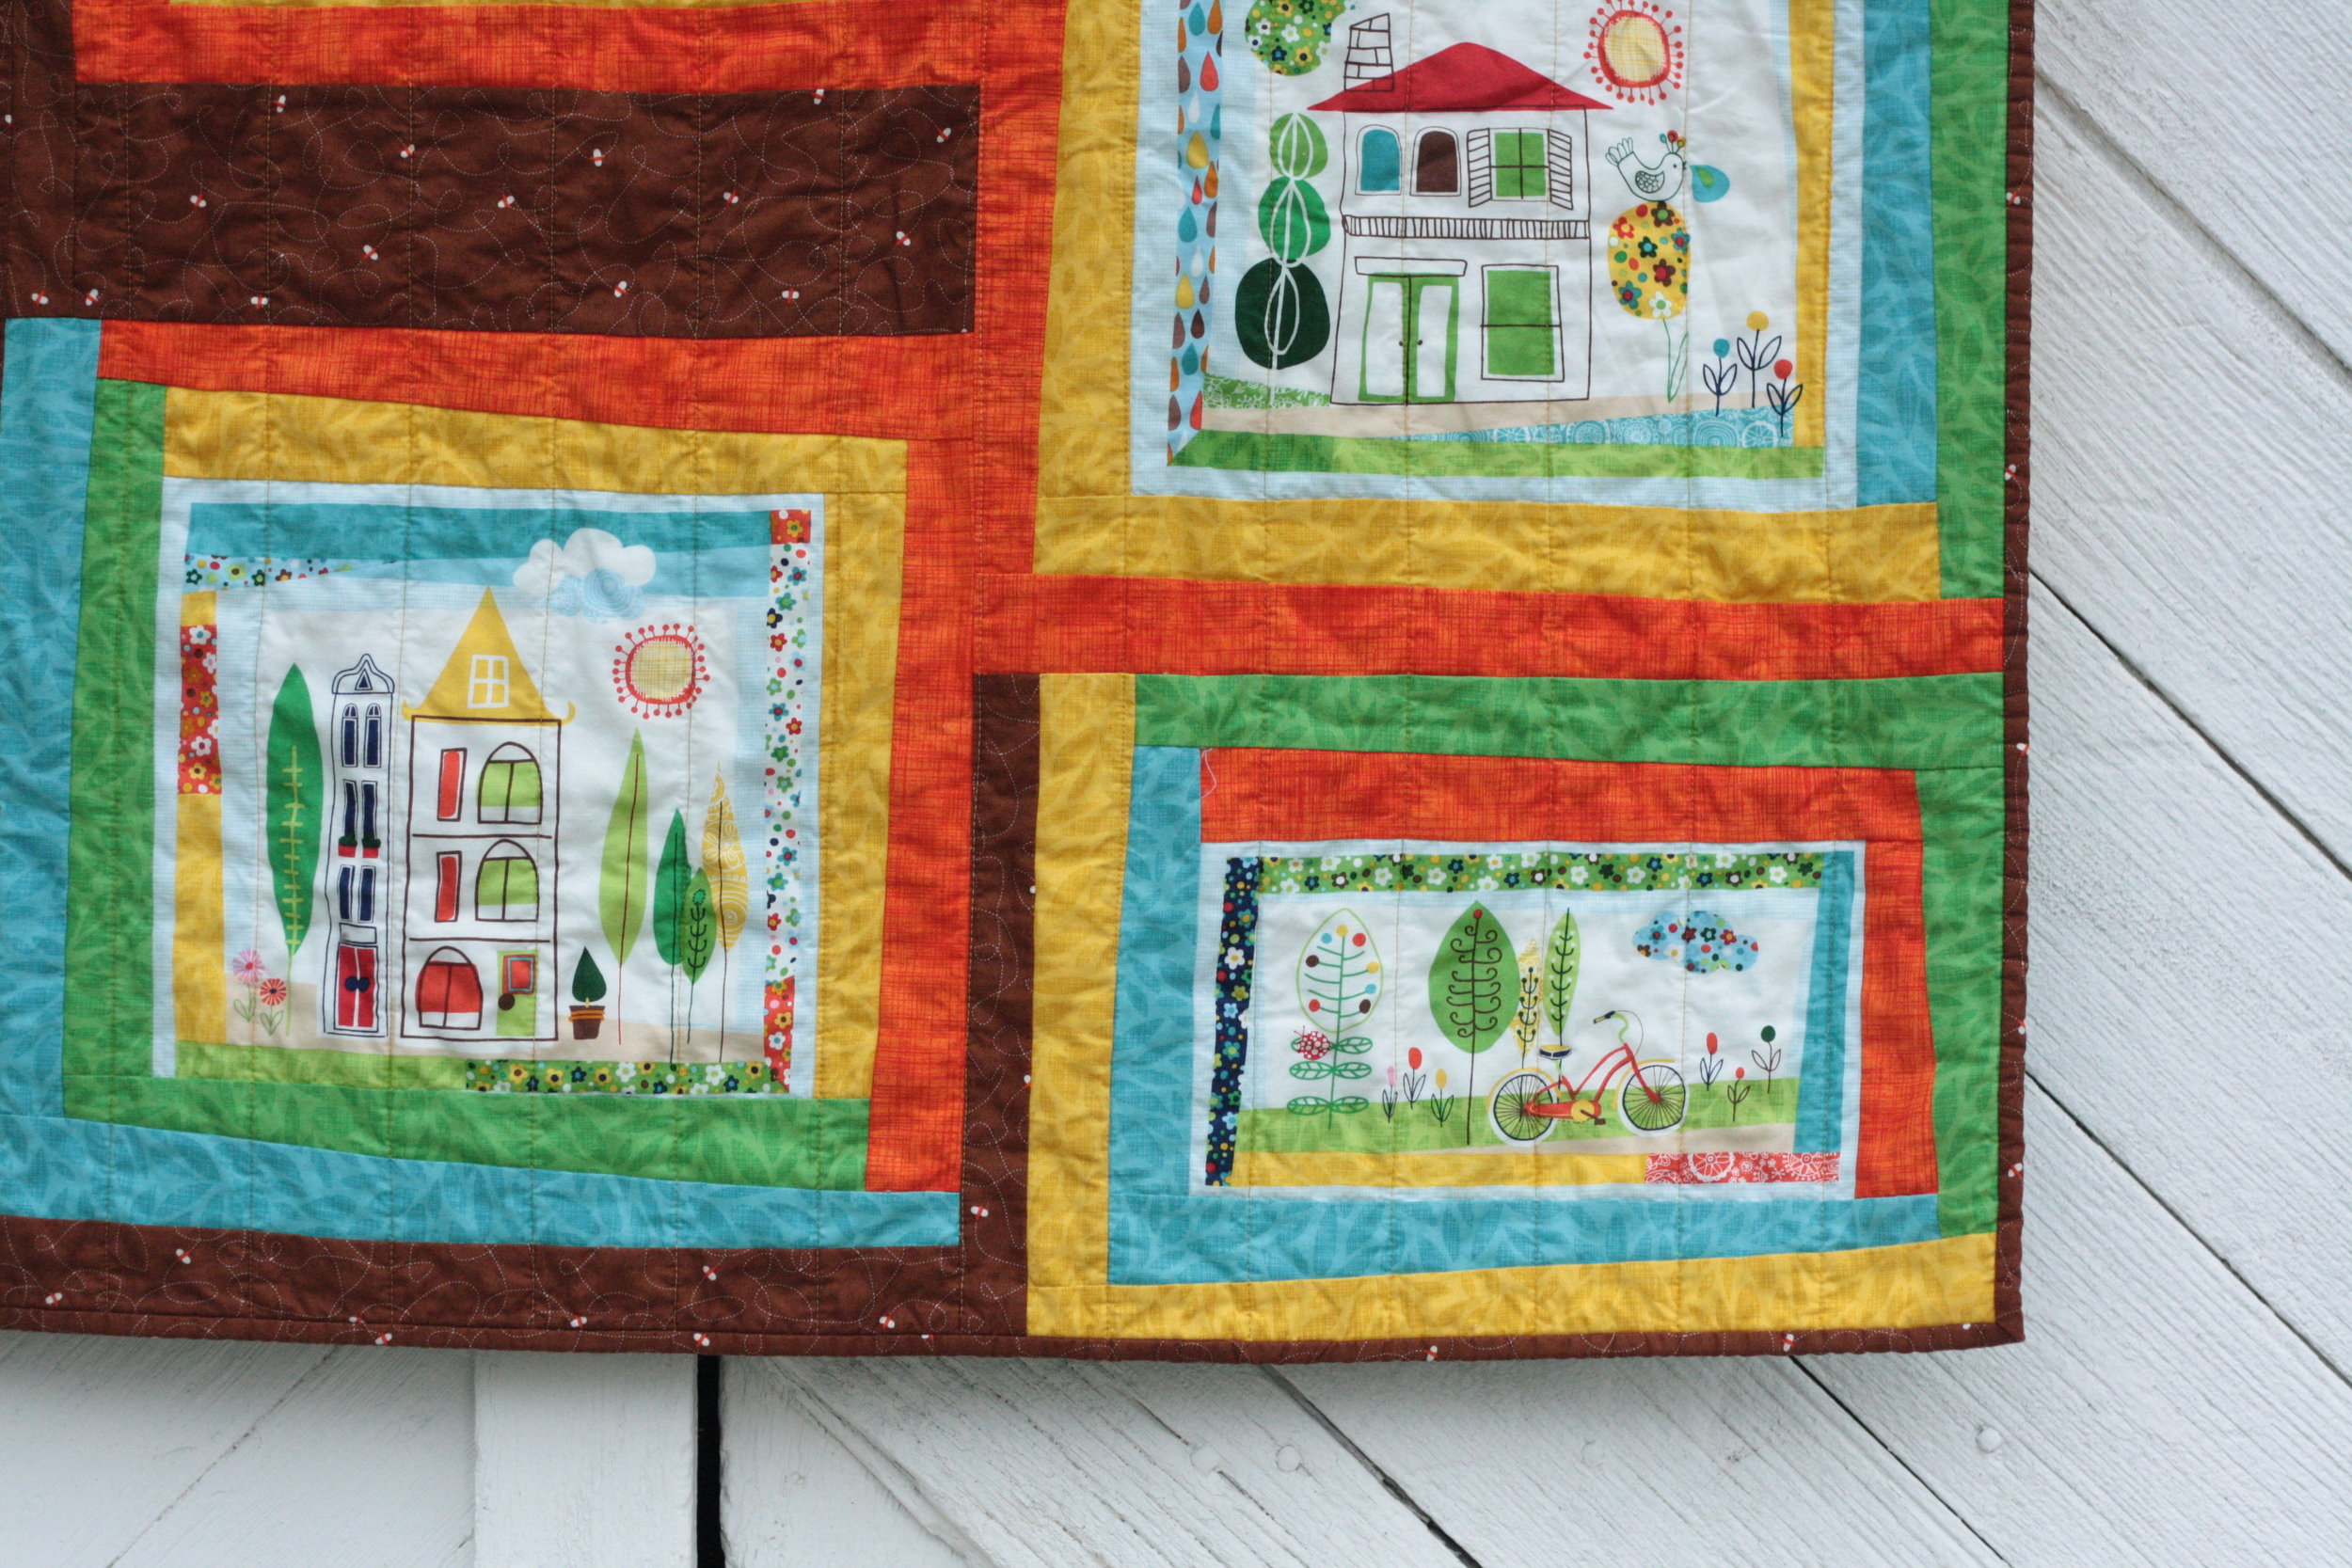
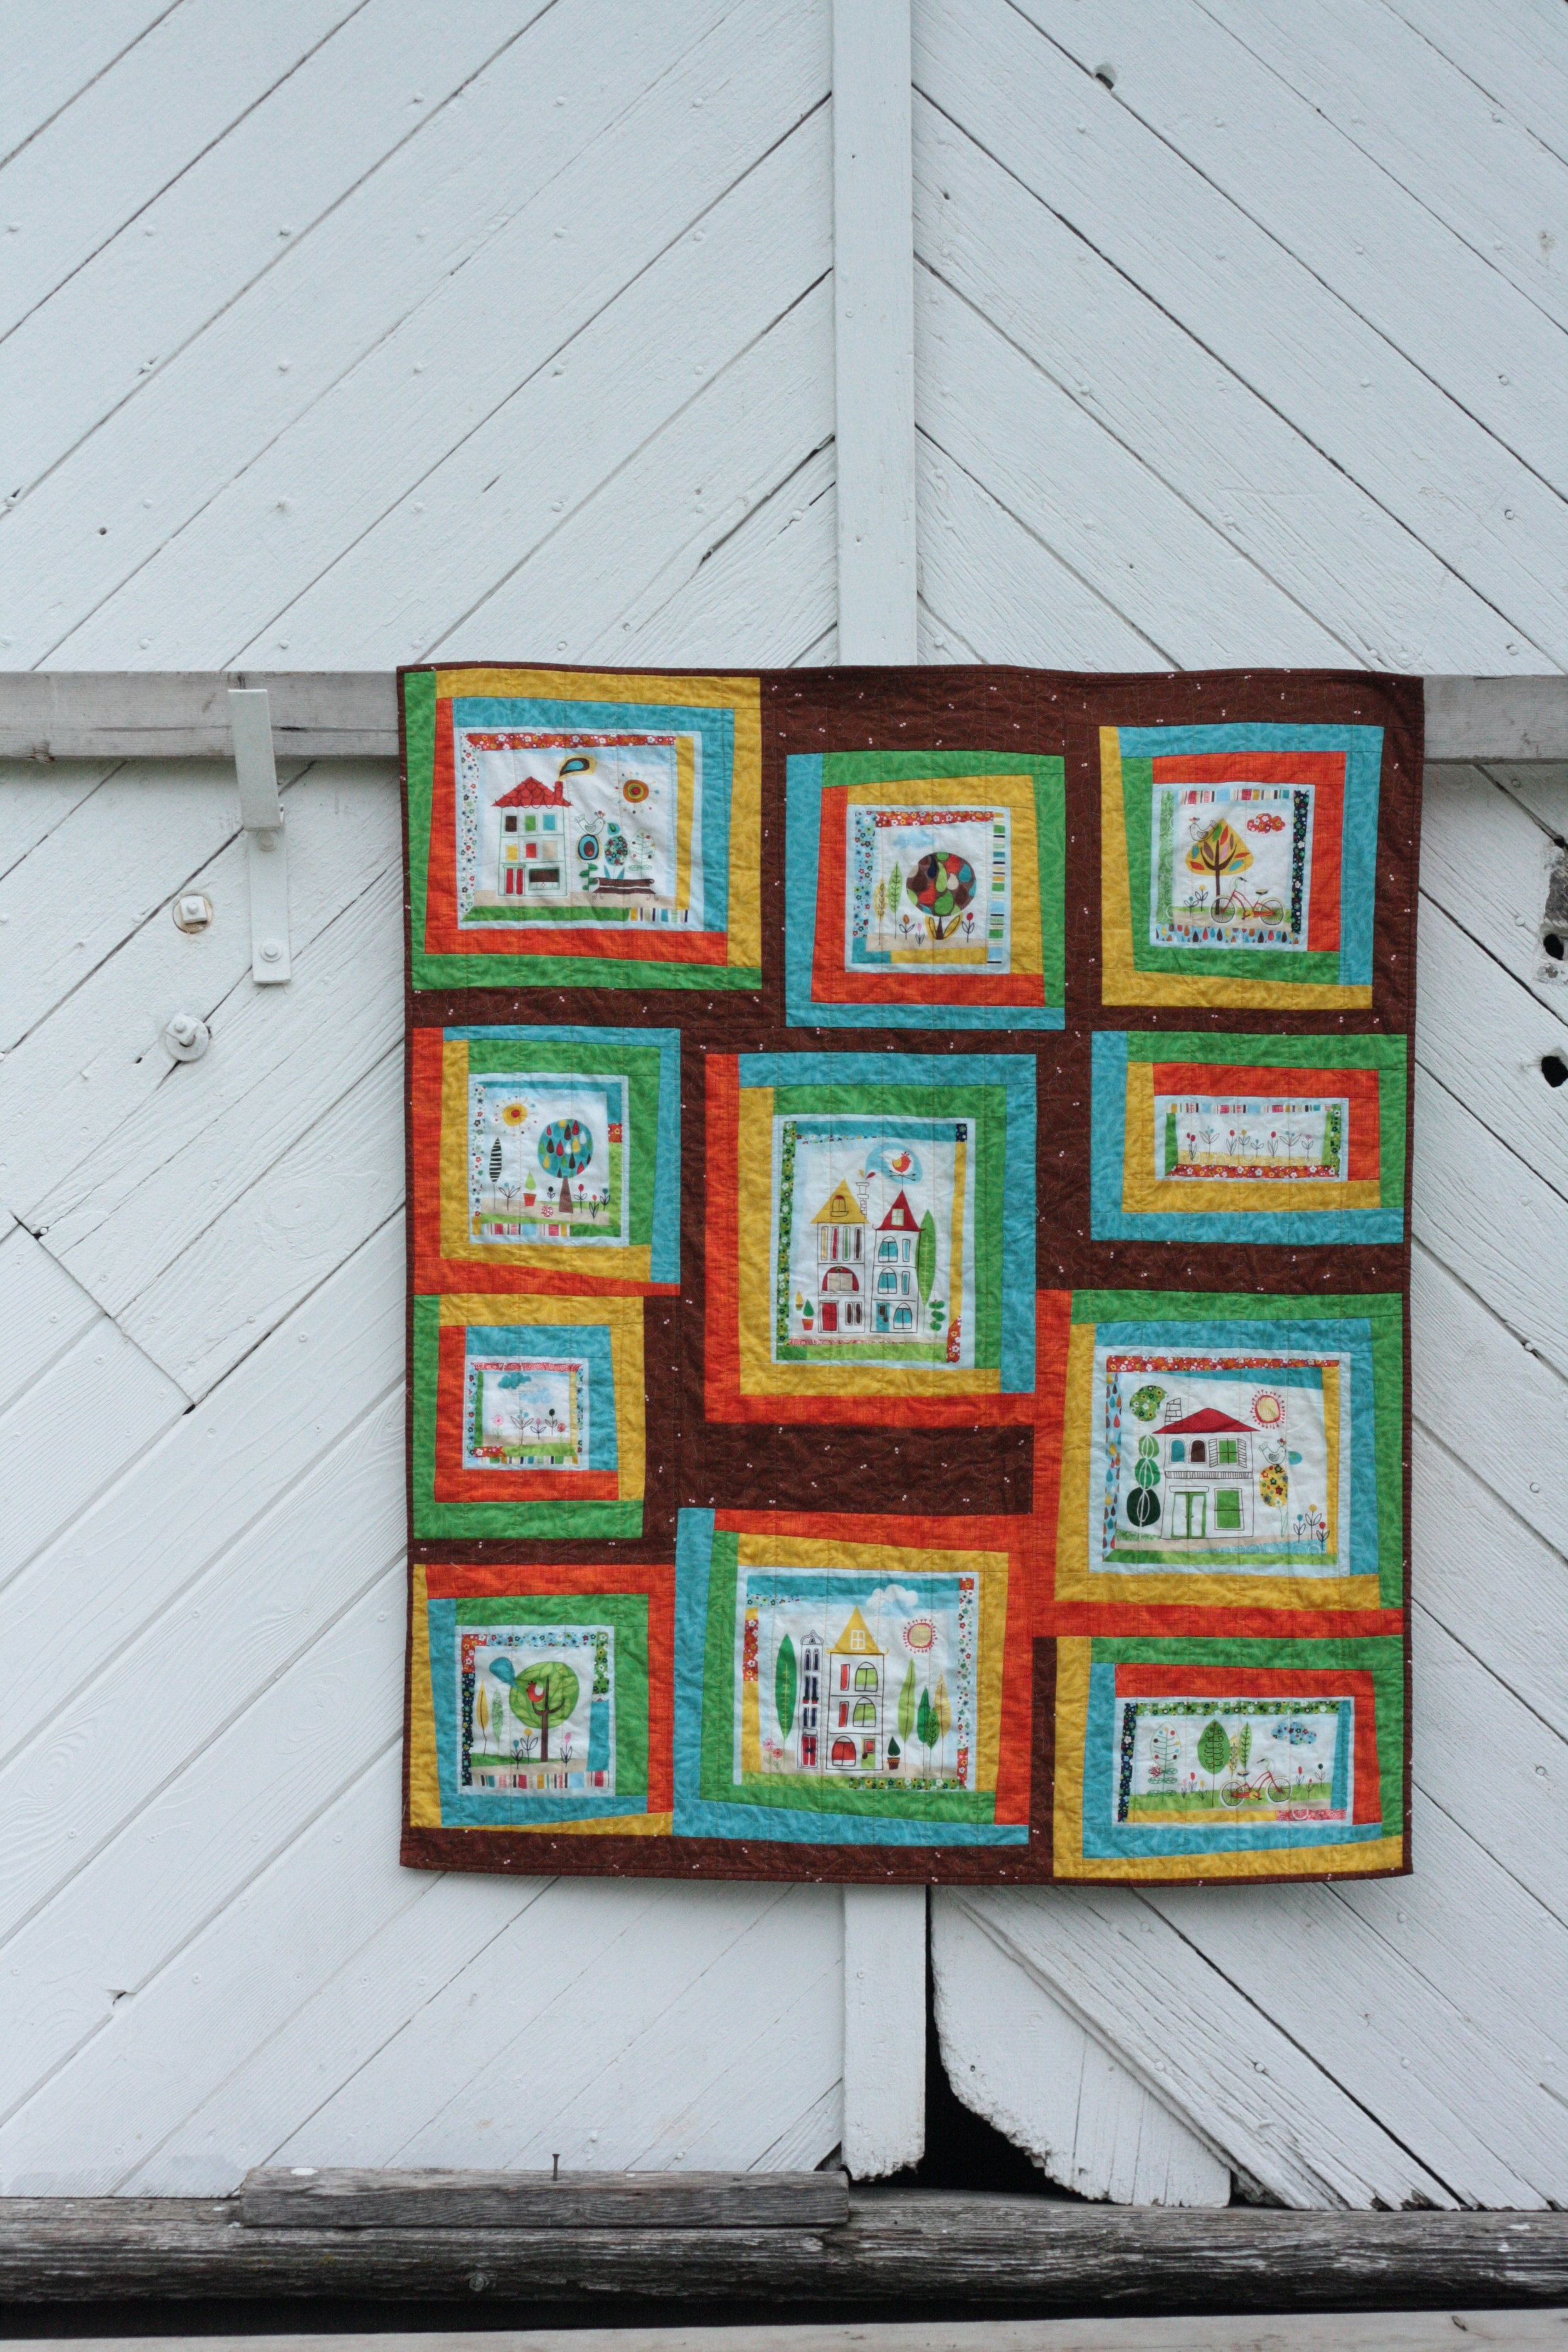
The heart of each log cabin block was part of a panel that I cut up and then edged with wonky bands of tone on tone orange, green, blue, and gold.  The orange is a cross hatch print, while the others are silhouettes of leaves.

The extra spaces around the blocks and the binding are a coordinating brown print that I think looks like little bees buzzing around, but is actually tiny airplanes.  I quilted it with gold thread in vertical straight lines.

back of around the block quilt
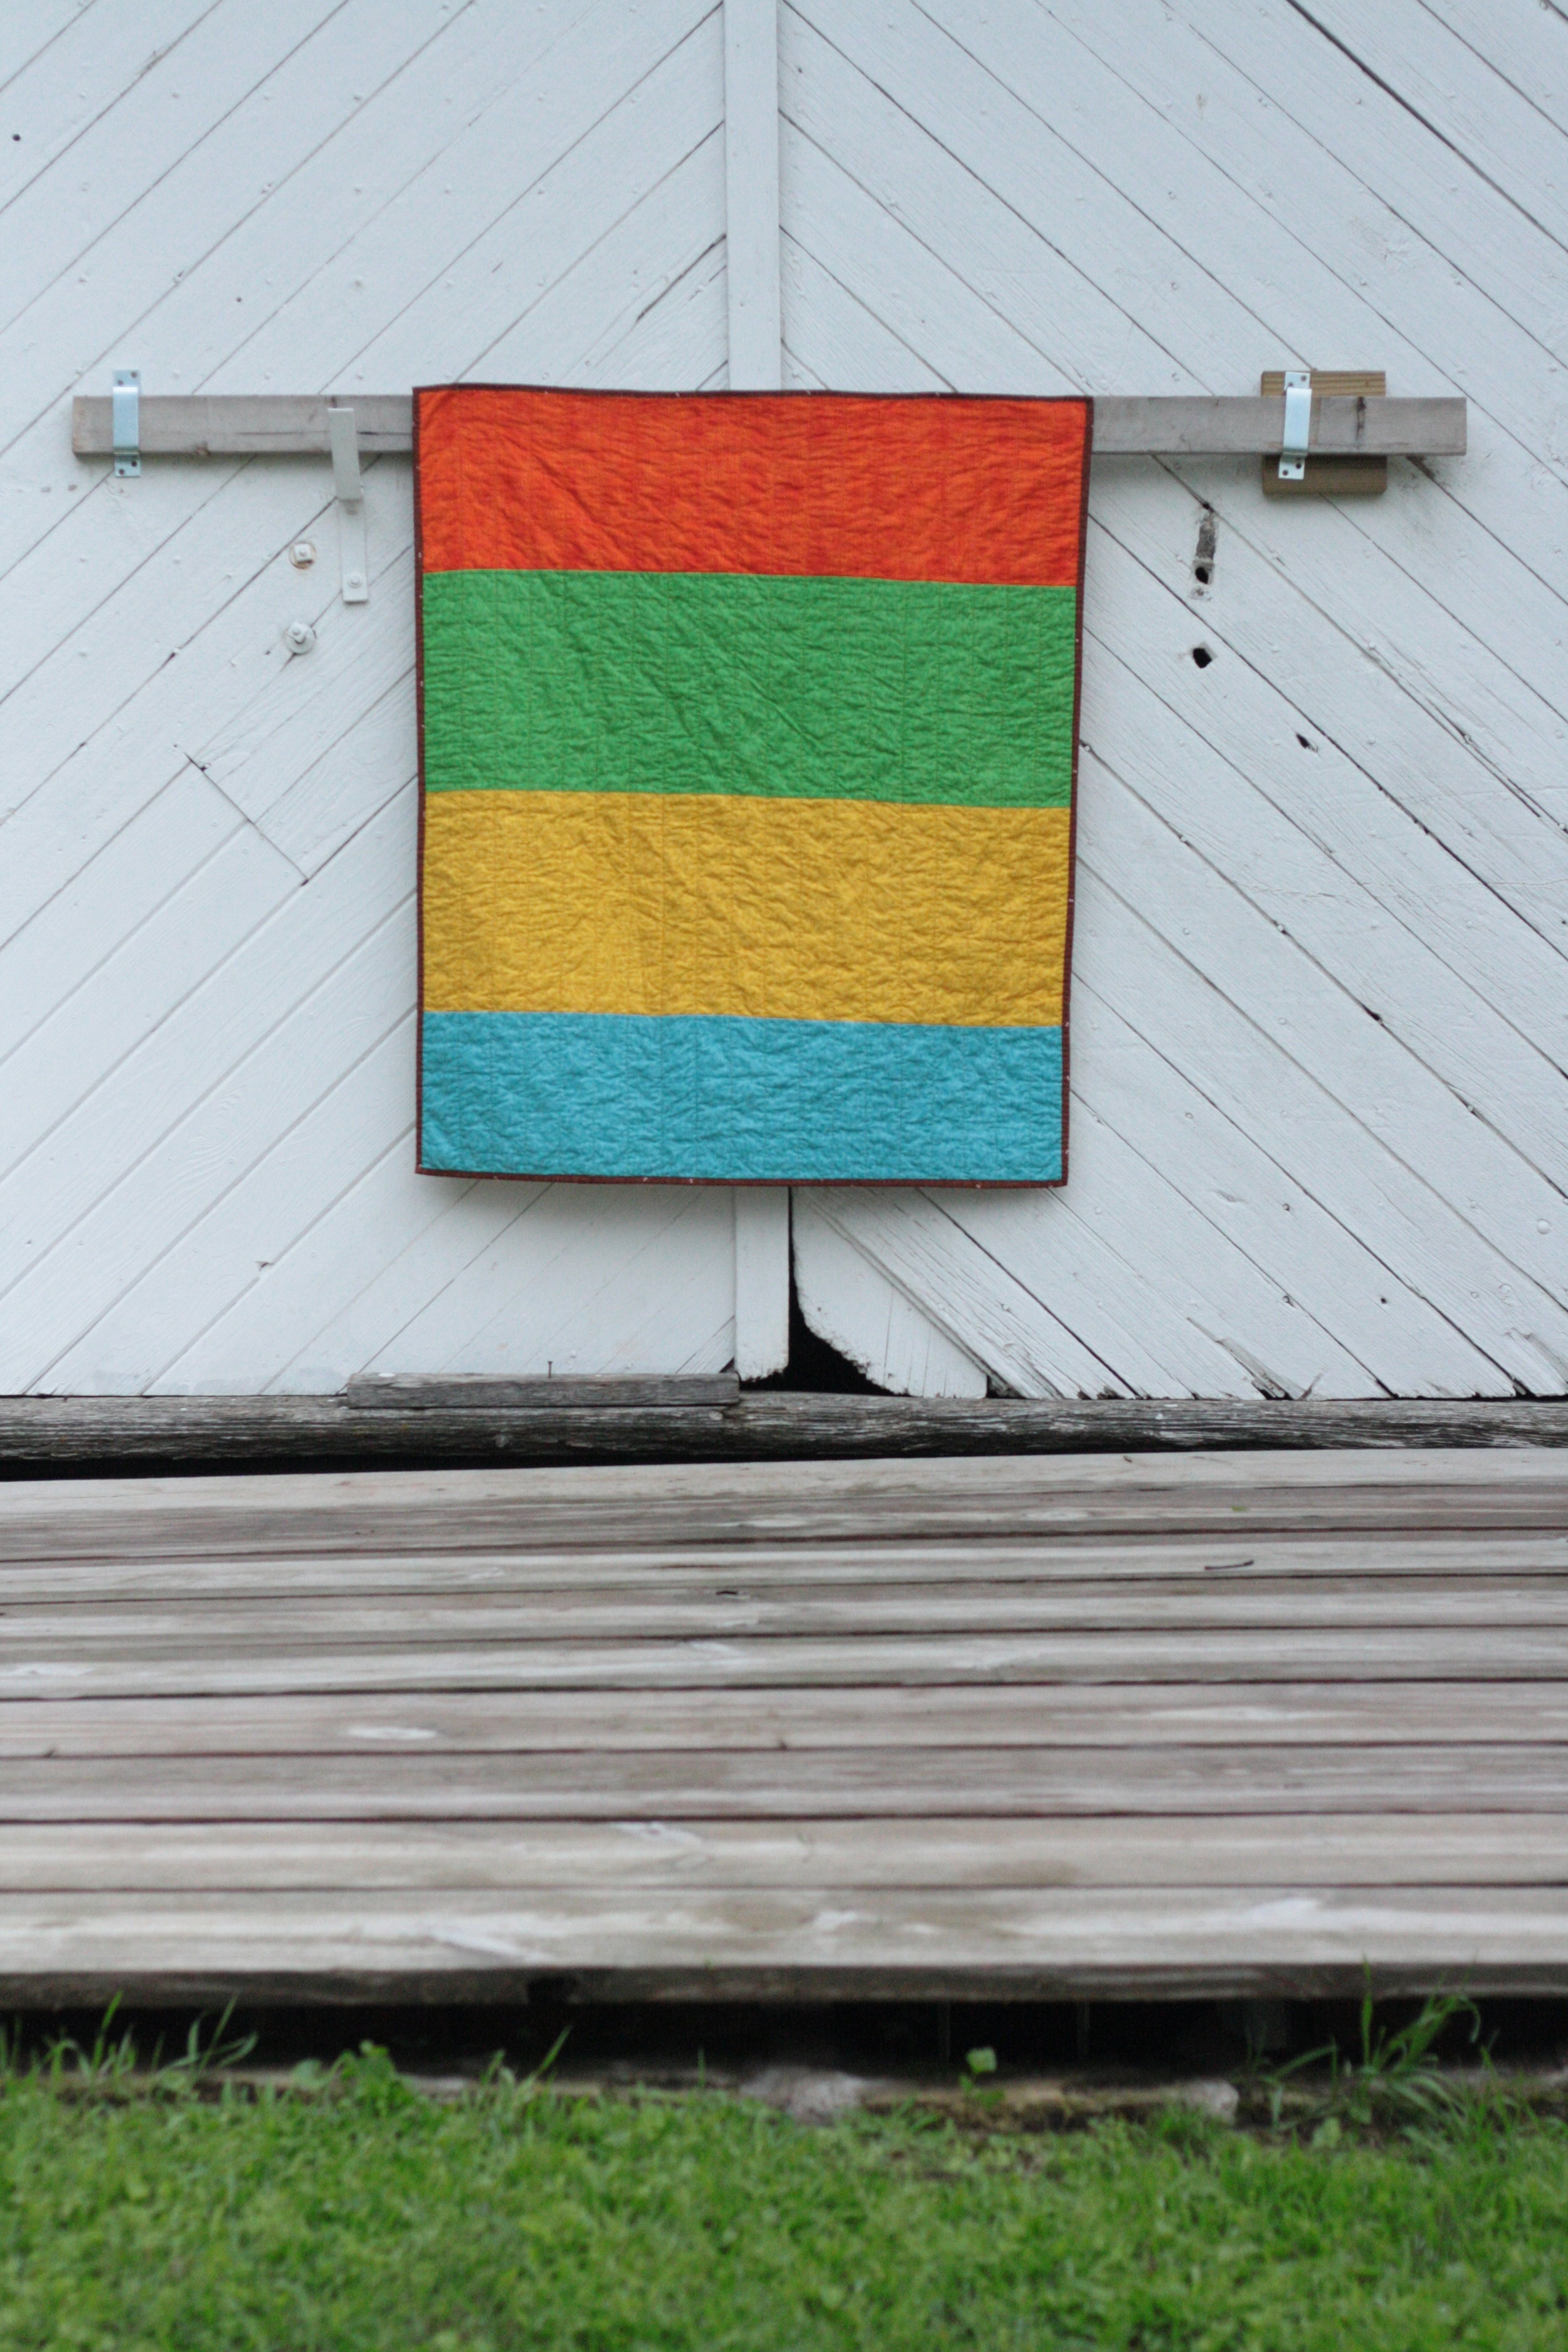
The back is big, wide bands of the coordinating colors that I used on the front.  aorund the block quilt

I think it makes for a great baby quilt.  I'm happy that in the end I powered through and kept working on this one.  It would have been a shame to let it sit on a shelf unfinished simply because it was bit frustrating in the middle of making it.

It will be listed soon.


summer indigo

indigo brushed and dipped with sugar syrup resist When I started this post I was going to link back to the tote I made with cotton I dyed last year with indigo.  Then I realized I never shared it here, only on instagram.

Luxe Tote in indigo and buckskin

It's the Luxe Tote pattern.  The handles and corners are buckskin.  The tote went together quickly and I will be making another one at some point, I'm sure.

I also wanted to take another try at indigo dying.  I love the shibori technique of long running stitches pulled tight and knotted.  That was how I created the fabric that was used for the tote.  I did a couple of pieces like that again.

indigo string shibori

I love the random shapes created by the tightening of the stitches.

I used some wooden drawer knobs and rubber bands for these.

indigo round drawer knobs as resist

I can't decide if I like the front or the back better with this pattern.   I also did a slow dip on a skein of wool.

indigo dyed yarn

I'm anxious to start knitting with this.

I won a copy of Visual Texture on Fabric a couple of years ago.  It's filled with great DIY ways to create texture on fabrics, many with things you probably already have on hand.

indigo brushed with sugar syrup resist

I used the sugar syrup method for these.  I scattered a lot of syrup at first in an attempt to create layers of color.  The longer the syrup sets, the more it will resist in the dying process.  My syrup was also thin, so it spread a bit leaving shadow lines around the white patterns.  I let the syrup set on the fabric for about an hour the first round and then used an old paint brush to apply the indigo.  Once the indigo oxidized, I rinsed it and scattered more syrup, waited, and rinsed.  I kept going with this process until I was happy with the color.  It was difficult to get that true indigo with the brush application, so I did a quick dip in the vat on a couple of yards.

indigo brush and dip with sugar syrup resist

I love the richness of color that appears after the dip.  I'm looking forward to cutting into these for more totes and maybe even a quilt.

indigo with string shibori resist

her quilt

Way back when in January 2011, lulu and I went shopping for fabric for a quilt for her bed.  She chose a fun mix of pinks with a bit of green mixed in.  We set them aside until we came up with a pattern. front of swoon

That fall, while I was on the Sewing Summit shop hop I picked up the Swoon pattern and started cutting into the stacks.  By sometime in 2012, I had finished two of the blocks and she had decided she didn't love pink the way she used to.

She loved blue and green and I was so happy I had not made any more than two of those giant blocks at this point.

swoon sideWe sorted through my stash and came up with a new stack.  I spent some more time cutting, stitching, quilting and finally last fall (just before the Thanksgiving deadline she gave me) her quilt was finished.

swoon on grass

At some point in this whole process, she asked me to hand quilt it.  Since she's on the short list of people I have a more difficult time saying no to, I agreed.  I machine quilted the sashing with some quick matchstick quilting not only because it looks cool, but also to hold the quilt together nicely while I spent the hours it took to hand quilt the blocks.

swoon back

I took advantage of the left over blocks to fill some space in the back along with a mix of prints.

I also took a huge sigh of relief when I finally finished it and she loved it.

summerlove new york beauty

summerlove new york beauty frontI made this quilt for my cousin who was married this past Saturday. It's the New York Beauty from Peggy Martin's Craftsy class, Quick Strip Paper Piecing.  It's a fun class.  I whole heartedly recommend it.  I made the pinwheel quilt from this class too. I love using Craftsy because you always have the videos to refer to if you get mixed up on a technique.

upper corner of new york beauty quilt

The fabrics are from Pat Bravo's Summerlove line. These colors remind me of the bride so I'm hoping she loves them too.

back of new york beauty quilt

The back is a jumble of leftover summerlove yardage.

center of new york beauty quilt

With all the sharp points in the piecing, I wanted to try to use the quilting to soften the look a bit.  I went with a scallopy (yes autocorrect that is the word I want to use) stitching line and randomly spaced them an inch to three inches apart in a pale blue thread.

quilting on new york beauty quilt

Don't worry, I don't have another cousin getting married next weekend so I won't be showing up next Monday with another wedding gift.  But the kids will be starting school mid week so I am hoping I'm back soon with lots of finished projects.

a wedding gift

I like to take quilt pictures at the one room school-house site just outside of town.  It's usually closed but on this day they were open for visitors so we were finally able to see the inside.

One of my cousins was married this past summer.  I wavered back and forth about what type of quilt to make and finally landed on this pattern from a craftsy class I had signed up for a few months before.  The solid grey is Kona ash and the rest of the fabrics are a mix from Art Gallery.

and now it's heading off to be long armed

This quilt is for my brother and his fiance.  He is a serious history buff and she lived in Great Britain for many years.  They asked for a quilt last year and when I suggested something with flags, they loved the idea.  Then he told me it needed to be king size.  Then I panicked, then I made them this kickin' quilt top. This quilt by Amy Smart became my jumping off point.

Both the Union and American flags are pieced according to their official sizes.

Three of the American flags have 13 stars that have been hand appliqued.

The flags were my starting point and from there I looked to history for my next step.  I loved the idea of a central motif surrounded by border upon border as seen in quilts from the late 1700's to early 1800's.  Unfortunately by the time I came up with this plan, my panel of flags was too wide to have all that extra border on the sides.

Things like this tend to happen when you plan as you sew.

So I went with bands at the top and bottom.  This book cover gave me the idea to make rows of off kilter flying geese.

I kept the feel of the historic quilts by adding corner blocks to the borders.

A red star in each corner that was closest to the flags and then Union shields on the corners of the flying geese rows.

Here's the completed quilt top.

Did I mention it's huge!  We had to bring it outside for a picture and call in our neighbor for an assist.

I've sent it off to my aunt to long arm and I can't wait to see it when it's done.